4.28.2011

"Stuck" to this website....

Har har! My husband brought this website to my attention, and I thought I would share it with you crafty types.  It's called This to That (click-able).


It's a very basic, straight forward website that gives you advice on the best type of adhesive to use when sticking things together. For instance, from the fabric drop down menu I chose Fabric. The second drop down box I also chose Fabric just to see what my options were.

It gave me multiple options including ones that would avoid stiffness (SSSSHHH! I hear you giggling all the way over here!) and non toxic solutions. All of the results are click-able, and bring you to an index entry on the site that tells you the toxicity of the glue, the time it takes to adhere, and where it is available. Some index entries also give you an estimated price and related glues or adhesives.

This website is definitely getting added to my bookmarks, and will come in handy the next time I need to make something that I can't use the sewing machine or knitting needles!

4.27.2011

Rainbows!

One project I'm working on (just started actually) is a Rainbow shadow box quilt like the one seen here:
Color Block Quilt
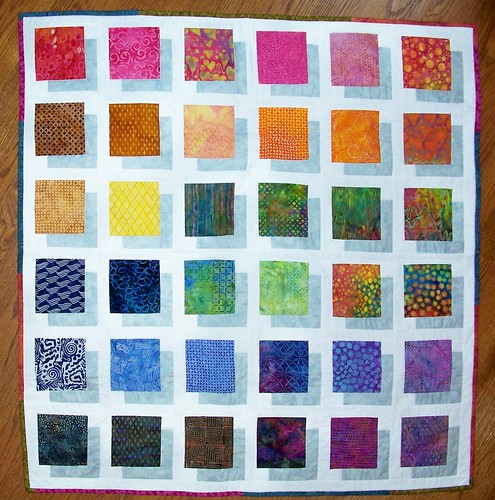
From Flickr user Quilts by Elena

It is an offshoot of the Ravelry LSG Beginners Quilting Bee. I needed to cut fat quarters into 5" charm squares and thought I would post a tutorial on how to make the most out of your fat quarter (12 charm squares from 1 fat quarter) It's easy really, but cutting always proves to be one of my least favorite things about quilting. So here is how I made it quick and easy with minimal waste.

First, clip the tiniest corners off of your fat quarters and wash them. Take them out of the dryer while they are still damp, and immediately iron them.
Then, on to cutting.

1. Fold fat quarter in half, meeting short ends together.


2. Line up the fold on your cutting mat, and trim off raw edge on right.


3. Cut 3 sections that are 5" wide. You will have a bit of scrap here to add to your scrap bucket.


4. Stack your 3 pieces and line up all edges. Line up the long edge on your cutting mat. Cut the raw edge off the right side, and cut into 4 5" inch sections. This will give you 12 charm squares.


The amount of scrap you have at the end of this will depend on how well your fat quarter was cut to begin with. Mine were all from JoAnn's and some were perfect, and others were wonky and terrible. So in my illustrated example, I have very little scrap left because this fat quarter was wonky, but in others I had an inch or 2 extra to add to my scrap bucket. Now repeat these steps for as many fat quarters as you need to cut. In my case, I needed 10 different blue fabrics. I did 11 to be safe, because one or two of mine were questionable as far as tone on tone qualities. I wanted to provide an extra so that the other participants could eliminate one if they didn't like it. I also had 2 fat eighths (I think? basically half a fat quarter) so you actually see 12 fabrics here.

(note: the one that is 3rd from the right looks like white background here but is not. Blame strange lighting and iPhone pictures.) 
Keep your eyes pealed for the other rainbow colors that will be arriving in the next few weeks for this project!

FINALLY back!

Blogging (and everything pretty much) eluded me the last couple of months. We've been dealing with my husband's health issues, which have gone from bad to worse. He has been in and out of the hospital more times than I can count and is still pretty much home bound. I'll spare you the gory details (you can read them on his blog if you want, thedailytwitch.blogspot.com) but the end result is probably going to be a pretty intense back surgery coming soon. Before that happens we need to move into a ground floor apartment, have a 3rd birthday party for a very special little girl, and get caught up on everything we've missed in the last few months.

In the meantime, the weather is quickly warming up here in Arizona and that means less knitting, hopefully more sewing (because it's cooler than working with wool) and lots of time at the swimming pool either here at our apartment complex, my sister's house, or my parent's house.


Stay tuned for pictures of current projects I'm working on including very little knitting, a few sewing projects, and nail polish? I know, I know that doesn't really fit in with my crafting blog but it's something I've been into lately so I will post about it here.